How to Upload an Addon to Steam Workshop

Garry's Mod
This particular has been removed from the community because it violates Steam Community & Content Guidelines. It is only visible to you. If yous believe your item has been removed by mistake, please contact Steam Support.
This detail is incompatible with Garry'south Mod. Please see the instructions page for reasons why this particular might not piece of work within Garry's Mod.
Current visibility: Hidden
This detail will only be visible to you, admins, and anyone marked as a creator.
Current visibility: Friends-only
This item will only be visible in searches to you lot, your friends, and admins.

Non enough ratings

How to publish an addon to the Steam workshop
Some people accept asked me how to publish a map to the Garry's Mod workshop. Here is a complete guide on how to publish an addon. I will exist publishing my map Garry's Battle royale Urban center for this demonstration!
The map contains custom textures, models, and a map icon to find it more easily in the maps tab of Garry's Mod.
If y'all desire to publish a custom weapon, NPC, vehicle, etc... you can yet use this guide!
Buckle up, and let's upload some files onto Steam's servers.
Introduction
Hello and welcome to my first guide where I will teach you how to properly upload your addon easily on the Steam Workshop for Garry's Modernistic!
I will be uploading my map Garry'south Mod | Battle Regal urban center but y'all can do information technology for custom weapons, model, NPC, etc...
Whatever render is appreciated, annotate or like

PS: If you desire to download my map, click here and if you like my work why non sub to my Steam Workshop folio hither
Comment rules
- No offensive comment!
- Any structured criticism is welcome!
- Be cool and nice to everyone, fifty-fifty if a person is not
- Avoid copy/paste messages, please.
- You can cocky-advertize your addon on the comment but no copy/paste(Practise not advertise the same addon twice)!
- Steam Rules and Guidelines
If you practise non follow the rules, your comment may be deleted.
Installing and configuring GMPU
Downloading and installing
GMPU is a tool allowing through a simple interface, to create GMA files (used by Garry'southward mod to simplify addon processing). Information technology also allows y'all to upload this GMA file to the Steam server under your business relationship to publish your addon to the Workshop! Don't worry, it's safe and easy to use if you know what you're doing!
GMPU can exist downloaded through this Source Forge page[sourceforge.net]
After the download is finished, yous volition have a compressed file. Just excerpt it in a folder wherver you want, you can now use gmpu! (Non actually, we must configurte it to work with your Steam account...)
Configuration
To configure GMPU, simply open the .jar file, you lot will accept this kind of window popping up on your screen!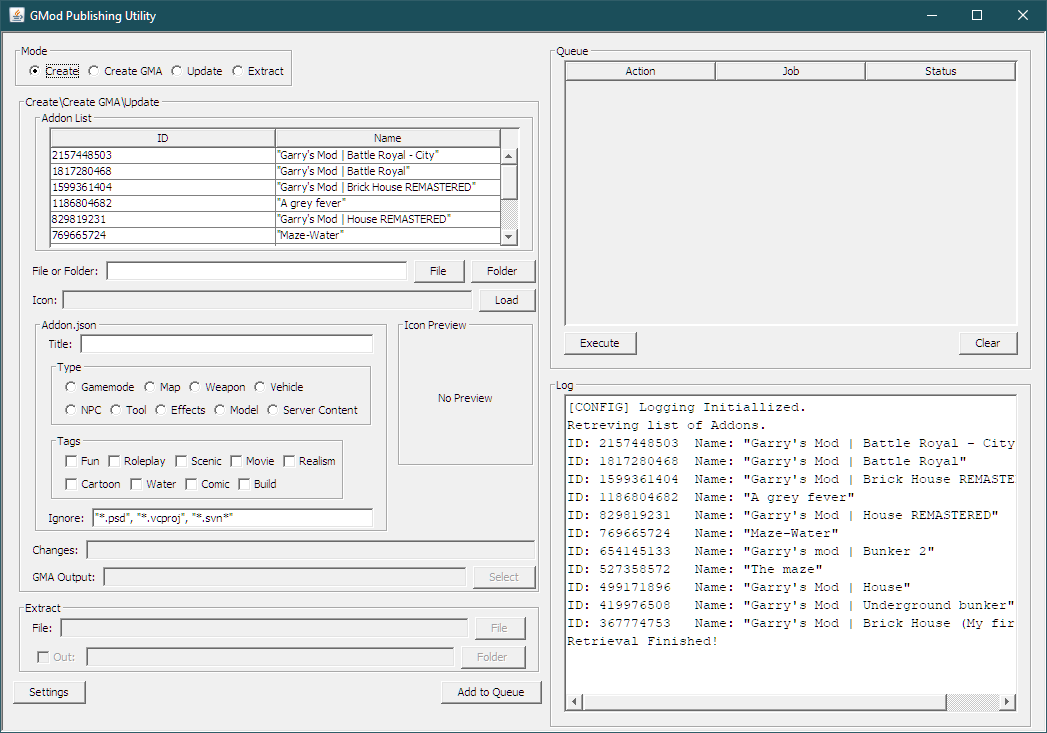
Now, let'southward configure GMPU past clicking the settings button in the lesser left corner of the windows!
A new smaller window volition pop upward. Click on the last button "Set Paths".
Some other window will announced. Here, but become to your Garry'southward Mod bin directory and select gmpublish.exe for the get-go one and gmad for the second one as such:

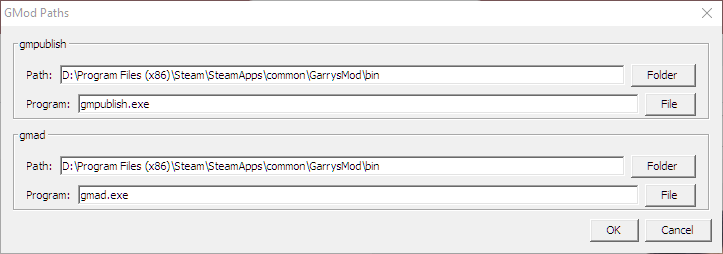
Now click OK! Y'all take successfully configure gmpu!
Setting upward your addon files
Before we can use GMPU, we have some prep piece of work to do offset!
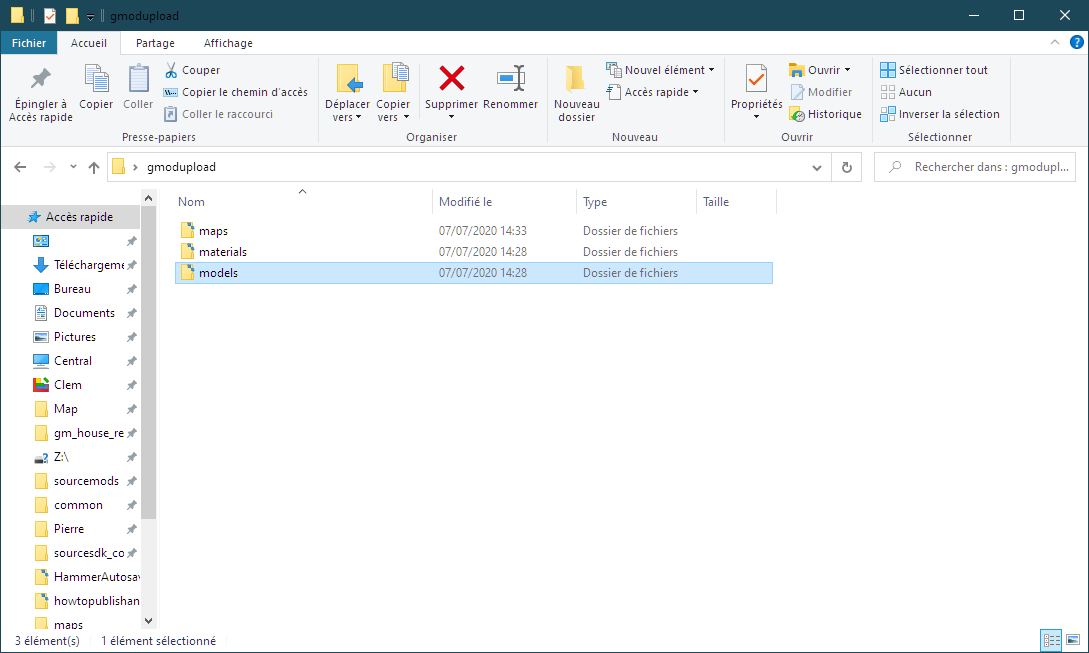
I commonly work past doing a folder on my desktop (the location doesn't really matter as long every bit it's piece of cake for you to reach.)
The proper noun of the binder doesn't actually matter much besides, merely don't make information technology too long, no special character, no spaces, etc..

And then I've got a maps folder, a materials folder, also as a model folder.
If you upload audio, you lot would put the sounds folder with your file, if y'all publish scripts, you would put your script in the lua folder, etc...
This process is important equally it's the footstep most people miss and fail. Recreating a perfect binder layout as garrysmod is of import!
SOME FILES ARE BLACKLISTED, you can't publish whatsoever you desire. Y'all can only publish .bsp, .mdl, .phy, .vtx, .vmt, .vtf, .wav, .png(for the map thumbnail in Garry's mod) etc... If yous try to
upload a file not recognized by the source engine / Garry'south Mod, GMPU volition return an error in the log department.
When yous have fully recreated the garrysmod layout with all your files in the right folder, we can starting time creating a GMA file and upload it to Steam server.
Maps thumb image
If yous are not uploading a map, you tin skip this step!
IF YOU ARE PUBLISHING A MAP, PLEASE, DO NOT SKIP THIS STEP!
Making and publishing the thumb prototype for your map
A lot of mappers publish a map without a thumb image. So, when people download their map, y'all find the usual map proper name without a thumbnail in Garry's Modernistic which is annoying and would simplify map choice for players.
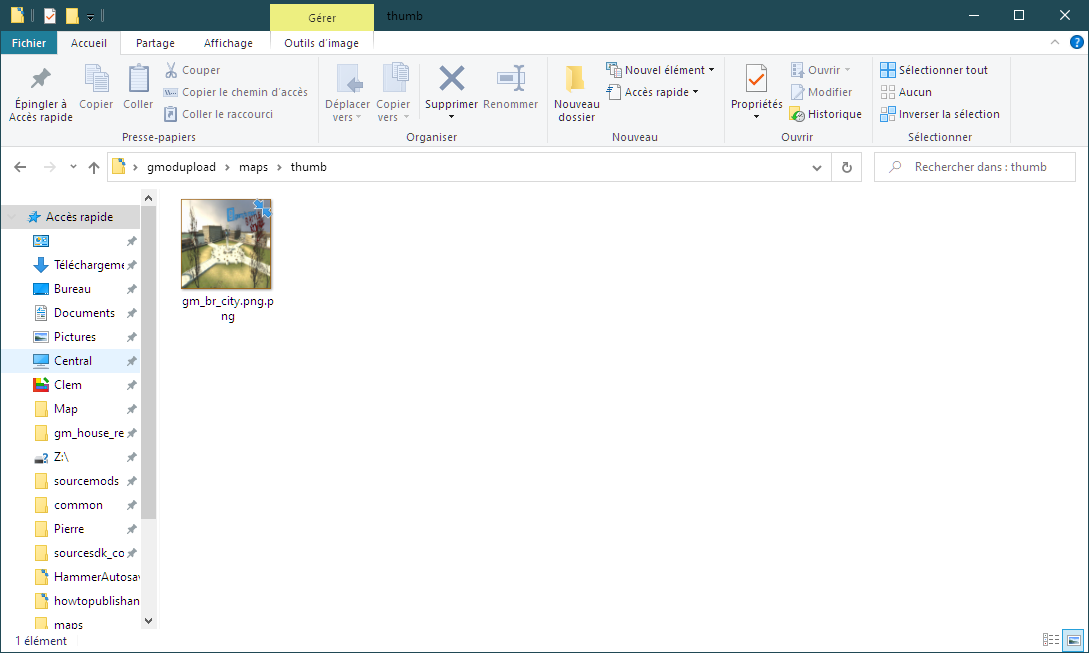
To create a thumb for your map, create an paradigm 128x128. Put whatever paradigm you desire (an prototype from your map would be preferable...)
When you're finished, export your file as a .png file in the: maps>thumb folder.
At present, when people will be searching for your map, they will discover it more hands on the map list and they volition be happy!
Creating a GMA file.
Before uploading your file to the Steam workshop, you must create a GMA file. To
simplify a lot a .GMA file is similar a .RAR or .ZIP file with your addon files.
Thanks to this file, Garry's mod will have a better fourth dimension managing addon and it's lighter for Steam'southward folder than to have hundreds of folders.
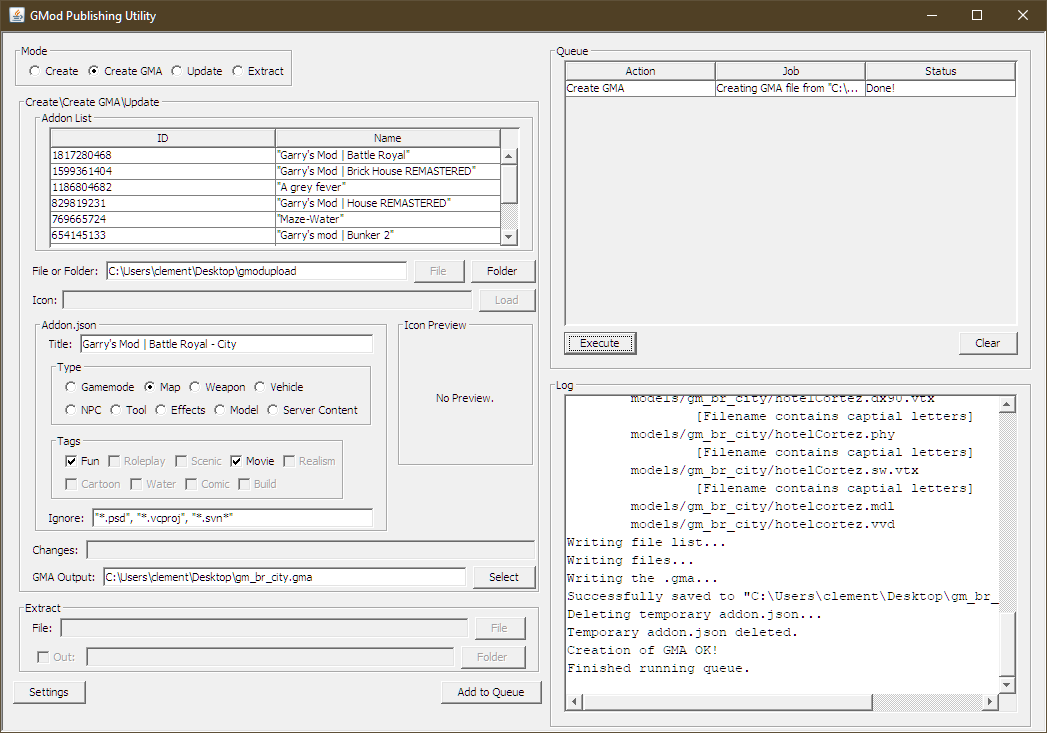
To create a .GMA file, open GMPU if it's not open already, and select create .GMA in the upper radio buttons option.

Select the different tags for your addon. Here, I chose Maps then Fun and Roleplay. These are used in the Steam workshop inquiry engine!
Then, for the .GMA output, select where yous find to generate your .GMA file and what proper name it will have. Equally always, no spaces, no special characters, not too long, etc...
When y'all are washed completing all sections, click the "Add together to Queue" button. You will have a new entry in the table on your right. Select it by clicking on the line and click on the button "Execute!"
If everything is good, you will have written "Washed!" in the status column.
If yous don't have "Done!" Written, fell costless to share your log in the comment, I volition try to help you find the problem!
If you lot have "Done!" this process, become in your .GMA output location to make sure a .GMA file has been created! If then, you can become to the next step without a trouble.
If you run into a problem during this step:
If you encounter a trouble during this footstep you can try this tips before going on forums or in the comment section beneath, perhaps you take but a little problem not worth wasting your fourth dimension troubleshooting the trouble.
- Make certain you don't have spaces, special characters in all your files/folders names. Also, make sure that your map proper name is under thirty characters including the .BSP part!
- Brand sure you lot haven't got whatsoever blacklisted files. Y'all can hands check for this error within the log box on the right. You will accept a line maxim something like "binder/file
[Not allowed by whitelist]"
- Make certain you take selected the root folder and not the models / maps / materials / ... folder when selecting your folder.
If any of these tips have helped you, comment downwards below the log and every possible information you tin for usa to help yous :)
Uploading the .GMA file (final step)
Congratulation! You have washed well-nigh of the work by now. We merely have to upload your .GMA file on Steam'southward server and you will have a new workshop item on your list!
To do so, change your selection from "Create GMA" to "Create" on the radio push button selection.
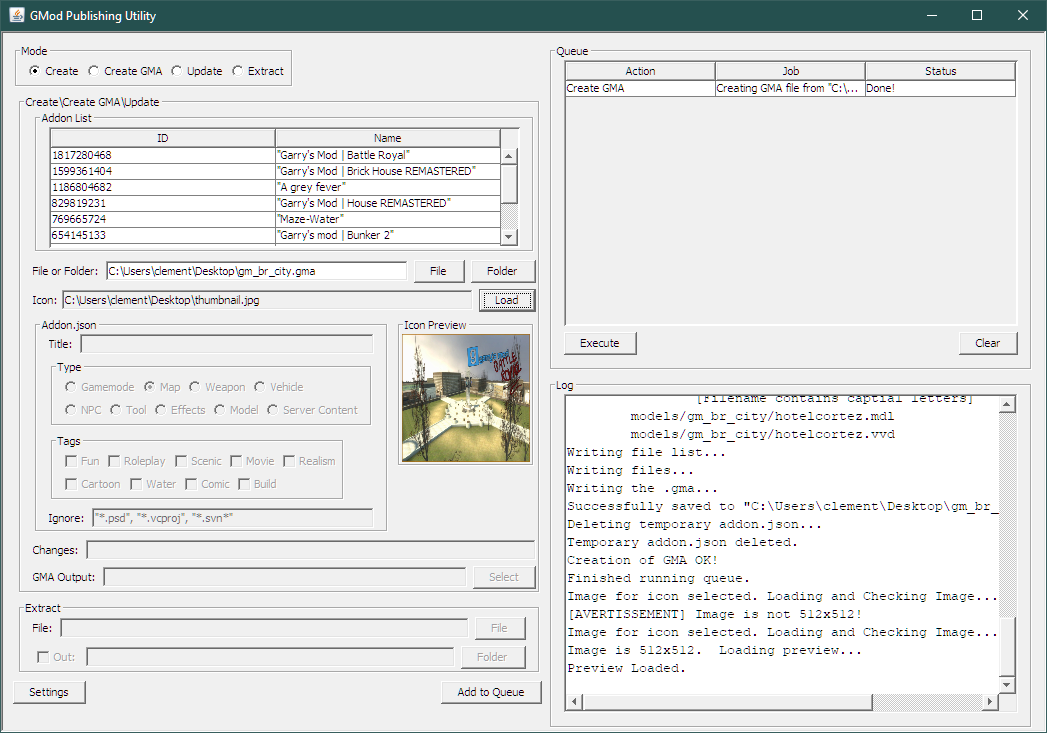
Select a 512x512
image for your item'due south thumbnail. Load information technology past clicking the "Load" button and by selecting your image!
WARNING

If you chose a .JPG file format, GMPU will crash the cosmos process! I tin't say information technology enough,
If yous get the aforementioned fault message I got, just change the extension of your file on paint to a .JPEG format!
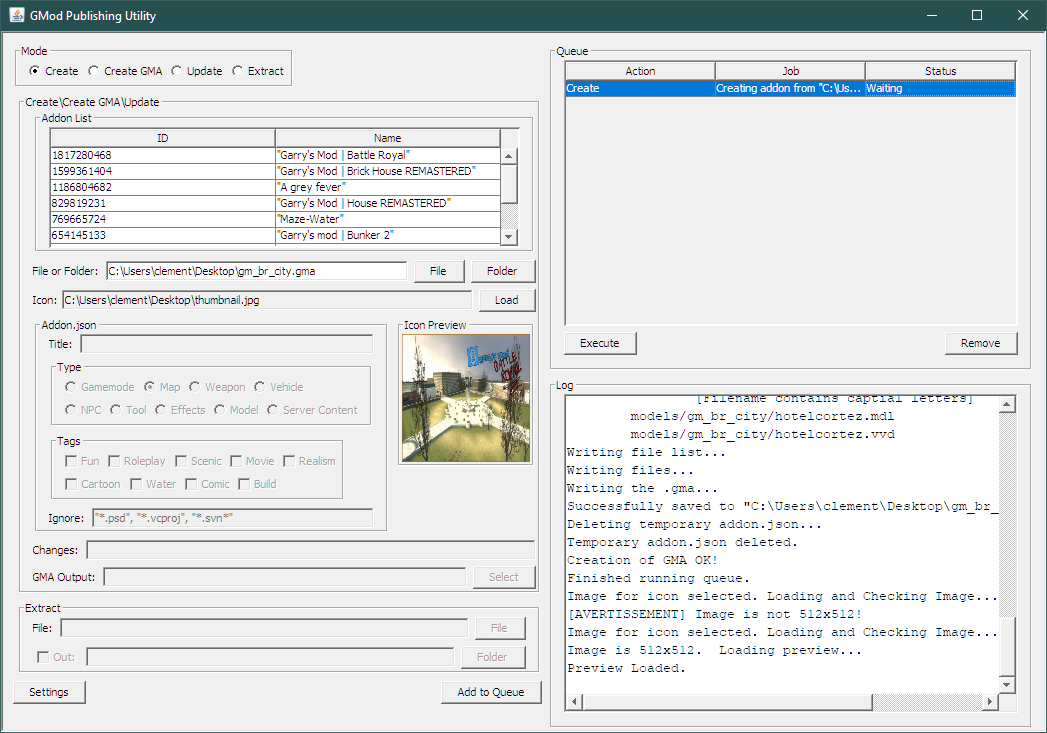
When y'all have completed each department, click on "Add together to Queue" and then on "Execute". Earlier YOU EXECUTE, remove the Create GMA Action, let'southward not confuse GMPU even if yous shouldn't have any problems by not removing the Create GMA activity.

Congratulation

If you have encountered any problem, y'all tin ask them in the comment.
If you take found one or more section of this guide isn't clear and if you didn't sympathise something, tell me in the comment as well, I will reply your question(due south) and try clearing upwards the guide!
Again, if yous liked this guide, please,
If you desire to download my map, click here and if yous similar my piece of work why not sub to my Steam Workshop page hither
Agur,
Ttiki.
Annotate rules
- No offensive annotate!
- Any structured criticism is welcome!
- Exist cool and prissy to everyone.
- Avert copy/paste messages, please.
- Steam Rules and Guidelines
If yous practise not follow the rules, your comment may exist deleted.
![]()
![]()
You need to sign in or create an account to do that.
Source: https://steamcommunity.com/sharedfiles/filedetails/?id=2157426798